I was cold last night. I had a hankering for a warm, spicy, comforting soup. I looked to see what I had in the pantry and fridge and then made up this recipe as I went along. It was exactly what I wanted, very, very easy, and enjoyed by all!
2 onions, chopped
1 sweet red pepper, chopped
1 large Granny Smith apple, chopped
2 Tablespoons butter
2 Tablespoons Patak Curry Paste (I use hot)
1 large can pumpkin (29 oz. size)
1 can coconut milk (15.5 oz size)
1 chicken bouillon cube
1 1/2 cups apple juice
water
salt to taste
In a large Dutch oven (or whatever you cook soup in) saute the onions and pepper in the butter til soft. Add the curry paste and the apple. Then add the pumpkin and coconut milk. Dissolve the bouillon cube in boiling water and add. Then add apple juice. Stir it all together over medium heat. If it seems too thick, add a bit more water til it's the consistency you like. (I added another cup and a half or so of water). Add salt to taste. Simmer for 15 minutes or so. Serve hot with a dollop of sour cream and toasted almonds on top, if desired.
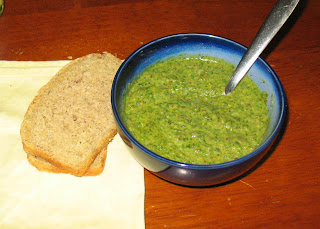
We ate this with toasted sourdough bread. This recipe served five generously and we had leftovers for lunch today.
Yum. Delicious. Comfort.
Thursday, December 2, 2010
Monday, November 15, 2010
Incredible Hulk Super Soup!
Tonight for dinner we had Super Soup! I had half a bunch of kale in the fridge that had partially been used for Raw Kale Salad last week and the rest needed to be used up, but wasn't crisp enough for another raw dish. Plus, I wanted Clara to get some kale. She did eat a couple pieces of the raw stuff when combined with dried cranberries on a fork, but didn't exactly scarf it down. This afternoon was rainy so it was a perfect evening for some yummy soup.
I combined a recipe for Potato Kale Soup from my newest cookbook, Simply in Season (thanks K&J!), with a recipe for Creamy Kale Soup that I found through Google. Like my mom, I rarely measure accurately when cooking - "I just" (as she says) throw things together. Here's a rough approximation of what I "threw" in the kitchen this evening:
1 onion, chopped
2 cloves garlic, minced
2 medium red potatoes, chopped small
Green lentils (maybe 1/3 c or so?)
Quinoa (maybe 1/4 c? remember to rinse well first!)
1 chicken boullion cube
1/2 bunch kale, chopped and stems removed
Water
Milk
Tahini (about 2 T)
Parmesan
I sauteed the onion and garlic in a little oil, then added the potatoes, lentils and quinoa, stirred them around a bit to toast, poured in enough water to just cover, added the boullion and left that pot to simmer. Meanwhile, I chopped the kale and steamed it in a separate pot (a tip from SIS - their recipe said if you cook the kale and potatoes together, the kale flavor will be too strong). Once everything was fairly soft I added the kale to the potato mixture and then pureed the soup in my blender in two batches. (A tip from a demo I saw this weekend - when blending hot soup, crack open the small plastic cap on your blender or else you will have an explosion!) I added some extra water to the first batch and some milk to the second batch to make them smooth enough to puree.
Once it was all blended I heated it briefly in the pot and added some tahini, a little salt, garlic powder and freshly grated parmesan. We ate it topped with a little more parmesan and fresh bread. Delicious and so good for you with the kale, quinoa and lentils! Luke dubbed it, "The Incredible Hulk Super Soup" due to its brilliant green color. If I had looked back at the Creamy Kale Soupe recipe I would have added a dash of curry powder for a little kick, but we liked it the way it was and Clara gobbled it up. She's really into dipping right now and this was great for dipping fresh bread. Mmmm...

Thursday, November 11, 2010
Grammie's Applesauce Cake
In our family, if a recipe is preceded by "Grammie's," you know it's going to be good! My grandmothers are both wonderful cooks who love to feed their families delicious food. So yesterday, when my aunt said, "Grammie has a recipe for applesauce cake that I LOVE!" and "I could eat a whole one of these BY MYSELF!" I knew it had to be good. I was looking for a recipe to use up a bunch of applesauce that had been opened for awhile, and this turned out to be just the thing. It truly was scrumptious and lived up to all the expectations I have of any recipe that comes from Grammie.
Applesauce Cake
2 cups flour
1 tbsp cornstarch
2 tbsp cocoa
2 tsp baking soda
1 cup sugar
1/2 tsp salt
1/2 tsp cinnamon
1/2 tsp cloves
1/2 tsp nutmeg
1/2 tsp allspice
1 1/2 cups applesauce
1 1/2 cups raisins
1/2 cup oil
Mix all ingredients and place in a greased and floured angel food cake pan. Bake at 350 for 50 minutes.
I was out of raisins, so I chopped up an apple and used that instead. I was also almost out of sugar (yes, it's time for a grocery run) so I used brown sugar instead of white and only 1/2 cup. Although Grammie said she usually uses sweetened applesauce and I might want to increase the sugar, my cake was plenty sweet for our tastes with the reduced sugar and unsweetened applesauce.
The cocoa powder was unexpected, but it really adds a depth of flavor to the cake that is special. It doesn't taste chocolatey, but deeper, richer, more layered or nuanced. Something like that anyway.
I also used half white whole wheat flour and half all purpose. My aunt says she has baked this in a 9x13 pan, but if you have one, I recommend the angel food pan. There's just something fun and special about a cake that looks like a huge, scrumptious doughnut. :) It filled the whole house with an absolutely tantalizing aroma while it was baking, and we've already eaten half of it! But with only 1/2 cup each of sugar and oil, I don't feel too bad about that at all!

Sorry I don't have a better picture of it. We were so excited to dig in after dinner and then I had to get Clara in bed right after. Speaking of Clara, she loved it! I don't give her many sweets, but this was a healthy, naturally sweet treat that I felt great about feeding her, and she felt great about eating! Win-win all around.
Applesauce Cake
2 cups flour
1 tbsp cornstarch
2 tbsp cocoa
2 tsp baking soda
1 cup sugar
1/2 tsp salt
1/2 tsp cinnamon
1/2 tsp cloves
1/2 tsp nutmeg
1/2 tsp allspice
1 1/2 cups applesauce
1 1/2 cups raisins
1/2 cup oil
Mix all ingredients and place in a greased and floured angel food cake pan. Bake at 350 for 50 minutes.
I was out of raisins, so I chopped up an apple and used that instead. I was also almost out of sugar (yes, it's time for a grocery run) so I used brown sugar instead of white and only 1/2 cup. Although Grammie said she usually uses sweetened applesauce and I might want to increase the sugar, my cake was plenty sweet for our tastes with the reduced sugar and unsweetened applesauce.
The cocoa powder was unexpected, but it really adds a depth of flavor to the cake that is special. It doesn't taste chocolatey, but deeper, richer, more layered or nuanced. Something like that anyway.
I also used half white whole wheat flour and half all purpose. My aunt says she has baked this in a 9x13 pan, but if you have one, I recommend the angel food pan. There's just something fun and special about a cake that looks like a huge, scrumptious doughnut. :) It filled the whole house with an absolutely tantalizing aroma while it was baking, and we've already eaten half of it! But with only 1/2 cup each of sugar and oil, I don't feel too bad about that at all!


Sunday, October 31, 2010
Turkey chili
This is for my friend, Chandra, who ate this chili at our soccer team end-of-season party and requested the recipe. Well, like much of what I cook, there's really no recipe. This was a throw it in the crockpot and see what comes out effort. What came out was pretty good, so I'll try and tell you what went in! I am guessing at quantities. I really did just start with the turkey, onions and peppers and then added tomatoes as needed.
1 package frozen ground turkey (from Aldi - not sure the weight, maybe 2 pounds)
2 -3 cans chili seasoned tomatoes
2 - 3 cans diced tomatoes
1 TBSP (or more if you want) chili powder
2 onions, diced
3 peppers (sweet red, yellow, orange or green), chopped
1 hot pepper
salt, if you need it
lemon pepper, if you like it (I do!)
Saute onions and peppers til soft. Add spices to saute. I do this in my 12' cast iron skillet. Put sauteed veggies in crock pot.
In the same skillet, brown ground turkey. Add to crock pot.
Add tomatoes to crock pot. Stir it all together. Taste to test. Adjust seasonings if necessary.
Set crock pot to high.
Go read a book.
Really. It's that easy. This is not a gourmet recipe, but a dump and go. I think I left it in the crock pot for a couple of hours til time to leave for the party! On a crisp fall night, sitting by a bonfire, accompanied by lots of other goodies brought by soccer moms, it was delicious!
Saturday, October 9, 2010
Meal Planning and a new Mac 'n Cheese
I used to be so organized in my meal planning, but in the last few months, I've really slacked off. We still eat well, mostly, but I tend to spend more at the grocery store and am far less creative. I also feel more harried in the late afternoon on days when I don't have anything planned.
Soooo, I'm getting back into the habit of planning my menus and then shopping according to the plan. For the next couple of weeks, I'll be using recipes from the Moosewood Low Fat Cookbook. I've had this book for years and have enjoyed everything I've cooked from it, but as with most of my cookbooks, there are many, many recipes I've never tried. So, I'm branching out in an old favorite!
The first new recipe I've tried is Moosewood's Lowfat Macaroni and Cheese. Every time I ask Joel for meal suggestions, he requests mac and cheese. I don't make it that often because it is such a high fat dish, but the Moosewood version replaces eggs and lots of cheese, with buttermilk, lowfat cottage cheese, and extra sharp cheddar. These three ingredients give it a rich, smooth tang. Grated onion and mustard powder add a lot of flavor. The odd part of this recipe is that you add uncooked noodles to the cheesy mix. I wasn't sure how that was going to work out. I've always cooked the elbows first. But it did work. Quite well, in fact. It was delicious and incredibly quick and easy. Best of all, Joel loved it. This is definitely one I'll add to the regular rotation, at least once a month, for the sake of warm, cheesy comfort and Joel's mealtime happiness!
1 1/2 c 1% cottage cheese
1 1/2 c skim milk or buttermilk (I used buttermilk - that's what I'd recommend)
1 t dried mustard or 1 T prepared mustard (I used dried)
pinch of cayenne (or more)
1/4 t nutmeg
1/2 t salt
1/4 t ground black pepper
1/4 c grated onions
1 c grated sharp cheddar (4 oz.)
1/2 lb. uncooked elbow macaroni (or other tubular pasta)
2 T finely grated Pecorino or Parmesan cheese (Instead of this, I used a little more extra sharp cheddar on the top and no bread crumbs)
1/4 c bread crumbs
Preheat oven to 375. Prepare square baking pan with a light spray of oil.
In a blender, combine cottage cheese, milk, mustard, cayenne, nutmeg, salt and pepper and puree until smooth. In a large bowl (actually, I did this right in the baking dish), combine pureed mixture with the onions, cheddar and uncooked macaroni. Stir well. Pour macaroni and cheese mixture into the baking pan. Combine the grated Pecoino or Parmesan and bread crumbs and sprinkle over top.
Bake about 45 minutes, until topping is browned and the center is firm.
Serves 4.
Sorry, no picture. It disappeared too fast!
Thursday, October 7, 2010
H & H: Apples!
Clara and I go through a LOT of applesauce. It is one of her favorite foods. I like to eat it too, but I really love to bake with it. I substitute it for oil in all sorts of recipes. So, since we you can't drive half an hour in any direction from our house without reaching an apple orchard, it was only natural that we take advantage of apple season to make our own. To get our apples, we visited a favorite place from my childhood: the Apple Barn in Bennington, VT. They have all sorts of yummy things there, but our objective was the back room, where you can get "utility" apples for $7 a half bushel (about $0.29 per pound). These are apples that are not beautiful enough for the front room displays - they may have bruises, be funny shapes, or for some reason just didn't make the cut (half the time I can't tell what's wrong with them). But they are still delicious and perfect for baking or making applesauce.


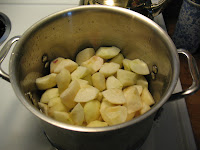 The apples then went into my biggest stock pot (I think it's 6 qts - not big enough!) with about an inch of water and a teaspoon or so of lemon juice in the bottom. I turned the burner on so the apples could cook as I was chopping the rest, and just kept adding until I couldn't fit any more without making it spill when I stirred!
 I cooked them for a good long while, until they were nice and mushy, and then pureed them in my food processor in batches. Because it was late at night, I put them in bowls in the fridge overnight.

 The next morning I returned the applesauce to the stock pot and reheated it while the jars and lids were getting sterilized.
 Once the jars were hot I took them out of the canner one by one, drained them, filled with the hot applesauce, added a lid and returned to the canner (sorry, no pictures of this part - you have to move fast and I didn't have anyone around to document). The filled quarts processed for 20 minutes, and then cooled on the counter.

Clara, of course, helped by being irresistibly cute.
 With my second batch, I did half in the stock pot and half in the crock pot. The stock pot got refrigerated overnight, the crock pot was on all night. The applesauce from the crock pot was incredibly dark, reduced by half, and had an amazing taste! Almost like caramel apples (it was also mostly Honeycrisps I separated out). The two batches switched pots after quick trips through the food processor. Here you can see the color difference!


I won't lie, in my low-tech kitchen this was a bit of a process. It's not difficult or tricky, just time consuming. Since I don't have a food mill, I had to peel, core and chop all the apples by hand (although with my second batch, Luke helped. He's wonderful!). 
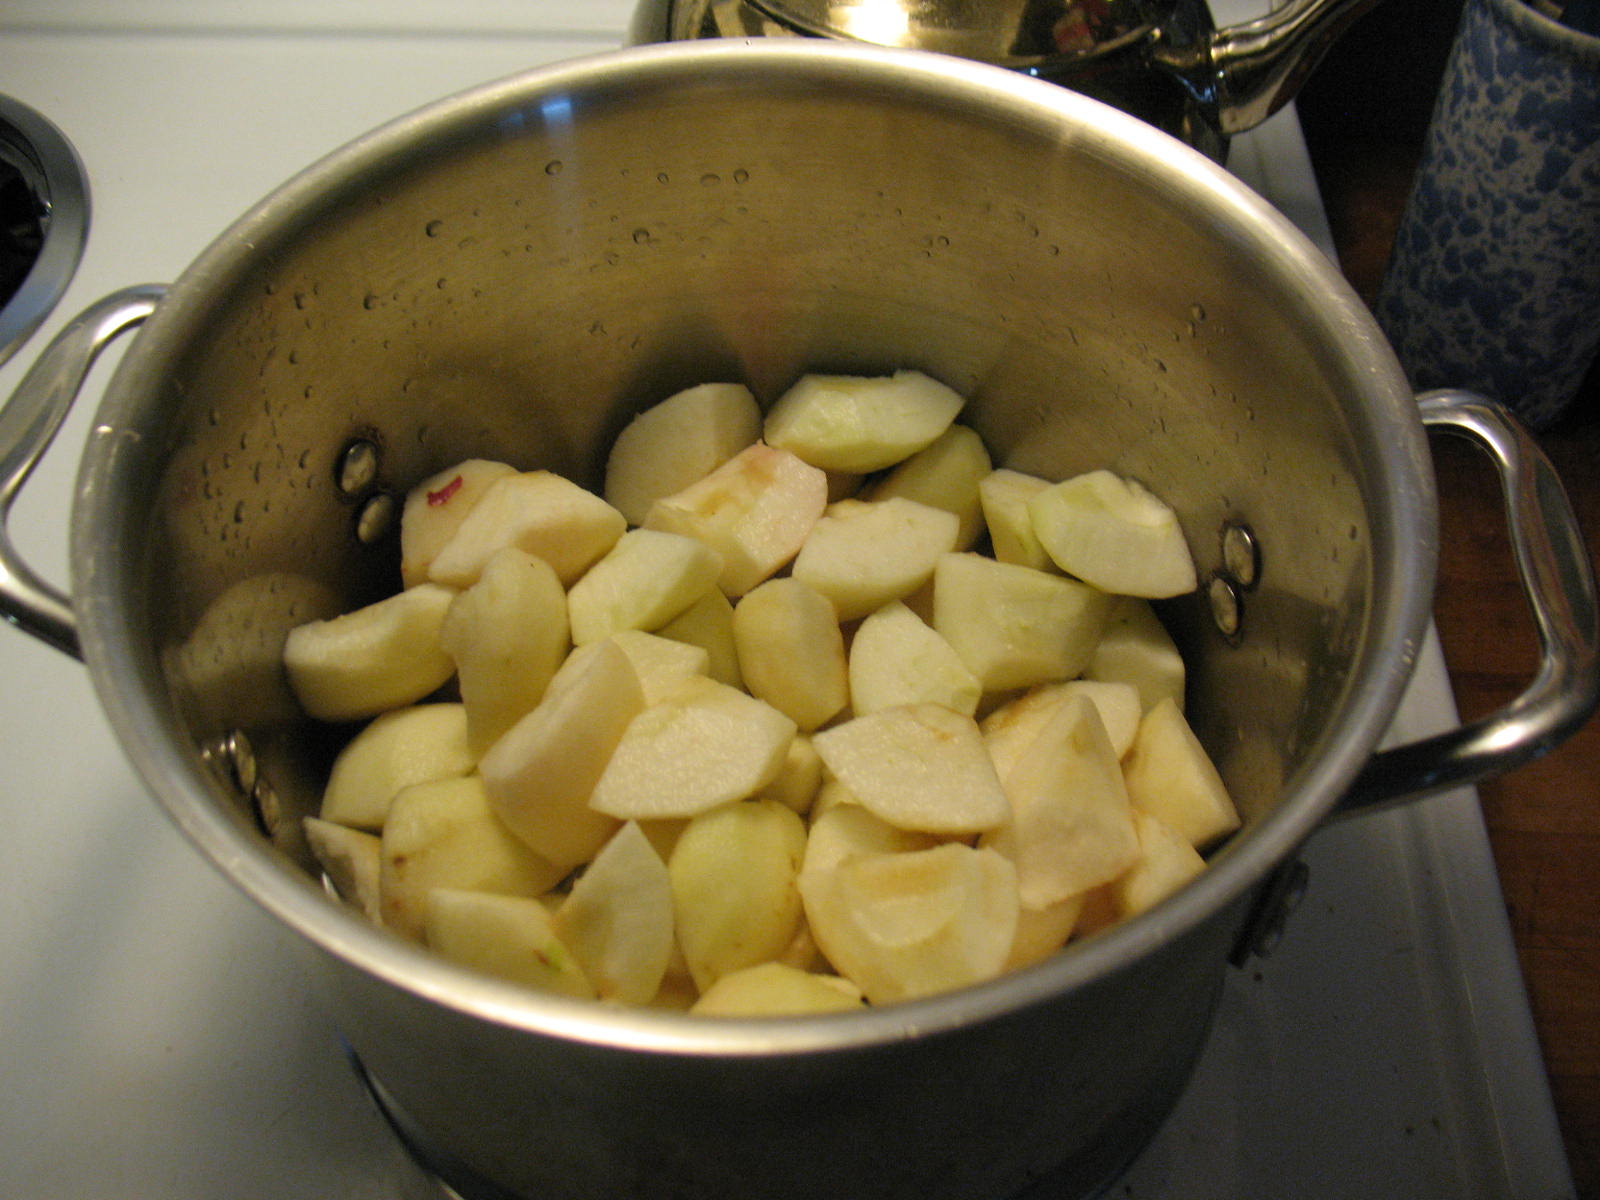 The apples then went into my biggest stock pot (I think it's 6 qts - not big enough!) with about an inch of water and a teaspoon or so of lemon juice in the bottom. I turned the burner on so the apples could cook as I was chopping the rest, and just kept adding until I couldn't fit any more without making it spill when I stirred!

 The next morning I returned the applesauce to the stock pot and reheated it while the jars and lids were getting sterilized.
 See how lovely and smooth it is?


Clara, of course, helped by being irresistibly cute.


Here are some of the finished jars next to a jar from my original batch.
 | ||
| Left to right: Crock pot honeycrisp, mixed, two stock pot jars, one jar from my previous batch. |
This applesauce is so, so delicious. Nothing from the store could ever touch it. Even if you don't can it, you really should make some this fall. It can be frozen, or refrigerated and eaten within a week or so (if it lasts that long). Clara was my taste tester and she fully approves! I think she ate 3 1/2 bowls without slowing down. :)
Thursday, September 23, 2010
Bread day
Yesterday was bread day for me. I made two batches, 1)a white rosemary with mostly organic bread flour (King Arthur) and just a bit of whole wheat and 2) a very dark, multi-grain, raisin bread. The rosemary bread was fine, two round loaves baked on the pizza stone and one baked in a loaf pan. One of the round loaves disappeared almost instantly.
The multi-grain bread was a near disaster. Not because the bread was bad, but because sometimes my brain simply does not work. People like me should ALWAYS set a timer on their bread because we all know it is a BAD idea to leave the house and forget to take the bread out of the oven! Do you want to know what happened? I'll tell you about the bread first.
I used organic whole wheat flour, a bit of bread flour, some oil, brown sugar (I would have used molasses, but I was out), polenta, steel cut oats, sunflower seeds, flax seeds, and raisins. The polenta and oats were soaked in boiling water and cooled before adding to the dough. I was going for a moist, dense, sweet, chewy loaf. A hearty breakfast bread.
I do wish I could give you a recipe, but I can't. I didn't measure. I was winging it on this one. Next time I will try and write down the amounts.
Anyway, about that bread left in the oven. I scooted out the door to take Joel to a soccer game. I remembered my knitting. I remembered my book. I remembered my ice cold ginger water. Did I remember that there was bread in the oven? I did not. Not until half time in the game - a good hour and a half past the time the bread should have come out of the oven. As I sat chatting with the soccer moms at half time, all of a sudden I remembered that bread. OH, NO!
I quickly called Thomas, who thank goodness, had stayed home to study. Wonderful, marvelous, diligent, studious son. He knew, of course, why I was calling. He had smelled the still lovely fragrance of slightly burning bread wafting up the stairs. Smart, intelligent, helpful son that he is, he came to the kitchen and discovered my error. The large loaves were only slightly burned on the outside and a little crisper than desired. The insides were fine. The small loaf was an inedible brick.
OK, so those loaves didn't turn out the way I wanted, but they are still good. A little drier than I was planning since they cooked too long, but if I had some of Erin's butter to put on them, no one would ever notice!
Wednesday, September 22, 2010
Homemade and Homegrown, Part 2

 We were greeted by an adorable little beagle who snoozed in the sun but kept one eye on us during our visit. Clara squawked at the 3 chickens hanging out in the garage (where the refrigerator with milk is) and pointed to the larger flock by the coop and the cows grazing across the valley.

If the $6 price tag takes your breath away, join the club. However, this milk is not for drinking (primarily, anyway). When I use it to make yogurt, I make 1/2 gallon at a time. My cost for 1/2 gallon of yogurt: $3 + $0.50 or so for the 1/2 cup of starter (if I buy it, less if I save it from the last batch). Cost for the equivalent amount of Stoneyfield Farm organic cream-top yogurt: $7.18 at my grocery store. Cost for the cheap, non-fat Aldi brand: $3.18. So I'm making organic cream-top yogurt from local, grass-fed cows for the same price as cheap Aldi yogurt. Not bad, in my opinion!


 The other half gallon of milk went back in the fridge in a large mixing bowl with a lid and sat until Monday morning. When I took it out, once again it had separated and there was a lovely layer of cream on top. Using a large spoon, I carefully skimmed the cream off and put it in the bowl of my food processor. Use #2 for this milk: homemade butter. Why make butter at home you ask? Because I can. Or at least, I'd heard I could and wanted to try.
 |
| The warmed milk. |


 |
| All tucked in! |
 |
| Here's the cream in the food processor, ready to go. |
 |
| I pulsed it a few times, then let it run for 15 seconds or so. Whipped cream anyone? |
 | ||
| It had a lovely soft set to it. Not quite whipped cream yet. |
 |
| See how much fluffier it got? |
 | |
| Oh.my.word. Now you're talkin. Heavenly creamy goodness. |
I have to say, the whipped cream was amazing. Just pure, whipped cream. As in, from a cow. Not from a green box at the store that says, "whipping cream." But at this point I was getting a little impatient. It was definitely taking longer than I thought and I wondered if somehow, I had done something wrong. I turned the food processor back on, walked away and started doing some dishes. Suddenly, I knew. I had butter! Not because I'm psychic or anything, but because the sound from the processor changed. I ran over, and sure enough, beautiful yellow butter was forming in my very own kitchen!
 |
| My first glimpse of homemade butter! |
 |
| After pouring off the buttermilk... |
 |
| ...real buttermilk! |
Pouring the buttermilk off was not the last step by any means. This butter still had to be rinsed. Six times, to be exact. I poured ice cold water in the processor, spun it a bit, then drained the (now cloudy) water off until it finally ran (mostly) clear.
 |
| Rinsing the butter. |
 |
| Isn't that a gorgeous shade of yellow?! |
 |
| Mmmmmmmmmmmm...... |
 |
| These jars are the best. And doesn't that butter look to die for? I'll be honest, it really was. |
Now, did you forget about the yogurt? I bet you did. I mean, how could you think about yogurt with all that gorgeous yellow creaminess in front of you, right? Well, the yogurt didn't forget about you. It faithfully and quietly did its job overnight, and in the morning looked like this:
 |
 A little soft, but really a lovely texture. So much better than anything you can get from the store. And the next morning it was both lovely and delicious on top of my oatmeal with a drizzle of maple syrup that was made the next town over. Butter may be flashy, but it's pretty hard to beat a simple, hearty, good-for-you breakfast that also happens to be scrumptious!
Homemade and Homegrown, Part 1
I'm excited to be posting here and sharing some of our family's adventures in food! We live on a tight budget, but I still try to serve up the freshest, most wholesome and delicious food I can. Our dream is to someday be able to produce most of our own food, from beef, chicken, eggs and milk to veggies, fruits and berries. I really want to learn how to make cheese, too! But for now we are taking baby steps towards our goal of all homemade and homegrown food.
Last Saturday consisted of two such baby steps. The first was all about tomatoes. I had four tomato plants this year, each a different variety. Two did well, and the other two did just okay. The harvest is winding down, but I still had some tomatoes I needed to use. Then, Friday night a good friend brought me lots of extra tomatoes from her parents' garden! Score! So Saturday I set to work. Here's what I started out with:

 I cut the cherry tomatoes in half, quartered the medium-sized red and yellows, and chopped the large tomatoes in roughly equal sized pieces, cutting out the tough stem areas along the way. Then, I tossed them with a drizzle of olive oil and a sprinkle of salt and spread them out on baking sheets. When I ran out of baking sheets (or room for any more in the oven!), I used a glass 9x13. This worked well for the larger tomatoes, as they were pretty juicy - I didn't really want tomato juice all over my oven. I threw a couple cloves of garlic on each baking sheet as well.

I roasted them at 225 for 3 hours, just like Mommy did for these tomatoes when she was here a few weeks ago. They came out of the oven looking and smelling heavenly.


But these weren't just for eating. I had talked with a friend earlier in the week who said she makes tomato paste with roasted tomatoes to use on pizza all winter. So I dumped all these lovely roasted tomatoes (except for a few cherries which somehow leapt into my mouth) into my food processor, along with the cloves of garlic I'd roasted with them, and pureed away.
Mmmmm, doesn't that look absolutely delicious? I had a small taste, and it is really scrumptious. The rest dutifully went in freezer bags and is waiting for winter, when it will brighten up our homemade pizza (or pasta!) with its lovely summer taste.
A confession: There was a bag full of tomatoes sitting out on a picnic table at church on Sunday. Church members often bring extra garden produce for anyone to take. Instead of taking one or two, I took the whole bag. After all, they looked a little sad, had some bad spots, and wouldn't have been great for eating fresh. I didn't want anyone to get sick. I chopped them up and roasted them on Monday, and we had them on pizza last night. Yum.
Last Saturday consisted of two such baby steps. The first was all about tomatoes. I had four tomato plants this year, each a different variety. Two did well, and the other two did just okay. The harvest is winding down, but I still had some tomatoes I needed to use. Then, Friday night a good friend brought me lots of extra tomatoes from her parents' garden! Score! So Saturday I set to work. Here's what I started out with:
 |
| Romas, golden mamas and half the cherries from my garden, the rest from Heather! |

 I cut the cherry tomatoes in half, quartered the medium-sized red and yellows, and chopped the large tomatoes in roughly equal sized pieces, cutting out the tough stem areas along the way. Then, I tossed them with a drizzle of olive oil and a sprinkle of salt and spread them out on baking sheets. When I ran out of baking sheets (or room for any more in the oven!), I used a glass 9x13. This worked well for the larger tomatoes, as they were pretty juicy - I didn't really want tomato juice all over my oven. I threw a couple cloves of garlic on each baking sheet as well.
I roasted them at 225 for 3 hours, just like Mommy did for these tomatoes when she was here a few weeks ago. They came out of the oven looking and smelling heavenly.


But these weren't just for eating. I had talked with a friend earlier in the week who said she makes tomato paste with roasted tomatoes to use on pizza all winter. So I dumped all these lovely roasted tomatoes (except for a few cherries which somehow leapt into my mouth) into my food processor, along with the cloves of garlic I'd roasted with them, and pureed away.
 | ||||
| All 3 pans of tomatoes, combined in the food processor. |
 |
| After a couple pulses... |
Mmmmm, doesn't that look absolutely delicious? I had a small taste, and it is really scrumptious. The rest dutifully went in freezer bags and is waiting for winter, when it will brighten up our homemade pizza (or pasta!) with its lovely summer taste.
 |
| Thick, smooth and delicious. Mmmmmmm... |
Subscribe to:
Posts (Atom)