Yesterday was bread day for me. I made two batches, 1)a white rosemary with mostly organic bread flour (King Arthur) and just a bit of whole wheat and 2) a very dark, multi-grain, raisin bread. The rosemary bread was fine, two round loaves baked on the pizza stone and one baked in a loaf pan. One of the round loaves disappeared almost instantly.
The multi-grain bread was a near disaster. Not because the bread was bad, but because sometimes my brain simply does not work. People like me should ALWAYS set a timer on their bread because we all know it is a BAD idea to leave the house and forget to take the bread out of the oven! Do you want to know what happened? I'll tell you about the bread first.
I used organic whole wheat flour, a bit of bread flour, some oil, brown sugar (I would have used molasses, but I was out), polenta, steel cut oats, sunflower seeds, flax seeds, and raisins. The polenta and oats were soaked in boiling water and cooled before adding to the dough. I was going for a moist, dense, sweet, chewy loaf. A hearty breakfast bread.
I do wish I could give you a recipe, but I can't. I didn't measure. I was winging it on this one. Next time I will try and write down the amounts.
Anyway, about that bread left in the oven. I scooted out the door to take Joel to a soccer game. I remembered my knitting. I remembered my book. I remembered my ice cold ginger water. Did I remember that there was bread in the oven? I did not. Not until half time in the game - a good hour and a half past the time the bread should have come out of the oven. As I sat chatting with the soccer moms at half time, all of a sudden I remembered that bread. OH, NO!
I quickly called Thomas, who thank goodness, had stayed home to study. Wonderful, marvelous, diligent, studious son. He knew, of course, why I was calling. He had smelled the still lovely fragrance of slightly burning bread wafting up the stairs. Smart, intelligent, helpful son that he is, he came to the kitchen and discovered my error. The large loaves were only slightly burned on the outside and a little crisper than desired. The insides were fine. The small loaf was an inedible brick.
OK, so those loaves didn't turn out the way I wanted, but they are still good. A little drier than I was planning since they cooked too long, but if I had some of Erin's butter to put on them, no one would ever notice!
Thursday, September 23, 2010
Wednesday, September 22, 2010
Homemade and Homegrown, Part 2

 We were greeted by an adorable little beagle who snoozed in the sun but kept one eye on us during our visit. Clara squawked at the 3 chickens hanging out in the garage (where the refrigerator with milk is) and pointed to the larger flock by the coop and the cows grazing across the valley.

If the $6 price tag takes your breath away, join the club. However, this milk is not for drinking (primarily, anyway). When I use it to make yogurt, I make 1/2 gallon at a time. My cost for 1/2 gallon of yogurt: $3 + $0.50 or so for the 1/2 cup of starter (if I buy it, less if I save it from the last batch). Cost for the equivalent amount of Stoneyfield Farm organic cream-top yogurt: $7.18 at my grocery store. Cost for the cheap, non-fat Aldi brand: $3.18. So I'm making organic cream-top yogurt from local, grass-fed cows for the same price as cheap Aldi yogurt. Not bad, in my opinion!


 The other half gallon of milk went back in the fridge in a large mixing bowl with a lid and sat until Monday morning. When I took it out, once again it had separated and there was a lovely layer of cream on top. Using a large spoon, I carefully skimmed the cream off and put it in the bowl of my food processor. Use #2 for this milk: homemade butter. Why make butter at home you ask? Because I can. Or at least, I'd heard I could and wanted to try.
 |
| The warmed milk. |


 |
| All tucked in! |
 |
| Here's the cream in the food processor, ready to go. |
 |
| I pulsed it a few times, then let it run for 15 seconds or so. Whipped cream anyone? |
 | ||
| It had a lovely soft set to it. Not quite whipped cream yet. |
 |
| See how much fluffier it got? |
 | |
| Oh.my.word. Now you're talkin. Heavenly creamy goodness. |
I have to say, the whipped cream was amazing. Just pure, whipped cream. As in, from a cow. Not from a green box at the store that says, "whipping cream." But at this point I was getting a little impatient. It was definitely taking longer than I thought and I wondered if somehow, I had done something wrong. I turned the food processor back on, walked away and started doing some dishes. Suddenly, I knew. I had butter! Not because I'm psychic or anything, but because the sound from the processor changed. I ran over, and sure enough, beautiful yellow butter was forming in my very own kitchen!
 |
| My first glimpse of homemade butter! |
 |
| After pouring off the buttermilk... |
 |
| ...real buttermilk! |
Pouring the buttermilk off was not the last step by any means. This butter still had to be rinsed. Six times, to be exact. I poured ice cold water in the processor, spun it a bit, then drained the (now cloudy) water off until it finally ran (mostly) clear.
 |
| Rinsing the butter. |
 |
| Isn't that a gorgeous shade of yellow?! |
 |
| Mmmmmmmmmmmm...... |
 |
| These jars are the best. And doesn't that butter look to die for? I'll be honest, it really was. |
Now, did you forget about the yogurt? I bet you did. I mean, how could you think about yogurt with all that gorgeous yellow creaminess in front of you, right? Well, the yogurt didn't forget about you. It faithfully and quietly did its job overnight, and in the morning looked like this:
 |
 A little soft, but really a lovely texture. So much better than anything you can get from the store. And the next morning it was both lovely and delicious on top of my oatmeal with a drizzle of maple syrup that was made the next town over. Butter may be flashy, but it's pretty hard to beat a simple, hearty, good-for-you breakfast that also happens to be scrumptious!
Homemade and Homegrown, Part 1
I'm excited to be posting here and sharing some of our family's adventures in food! We live on a tight budget, but I still try to serve up the freshest, most wholesome and delicious food I can. Our dream is to someday be able to produce most of our own food, from beef, chicken, eggs and milk to veggies, fruits and berries. I really want to learn how to make cheese, too! But for now we are taking baby steps towards our goal of all homemade and homegrown food.
Last Saturday consisted of two such baby steps. The first was all about tomatoes. I had four tomato plants this year, each a different variety. Two did well, and the other two did just okay. The harvest is winding down, but I still had some tomatoes I needed to use. Then, Friday night a good friend brought me lots of extra tomatoes from her parents' garden! Score! So Saturday I set to work. Here's what I started out with:

 I cut the cherry tomatoes in half, quartered the medium-sized red and yellows, and chopped the large tomatoes in roughly equal sized pieces, cutting out the tough stem areas along the way. Then, I tossed them with a drizzle of olive oil and a sprinkle of salt and spread them out on baking sheets. When I ran out of baking sheets (or room for any more in the oven!), I used a glass 9x13. This worked well for the larger tomatoes, as they were pretty juicy - I didn't really want tomato juice all over my oven. I threw a couple cloves of garlic on each baking sheet as well.

I roasted them at 225 for 3 hours, just like Mommy did for these tomatoes when she was here a few weeks ago. They came out of the oven looking and smelling heavenly.


But these weren't just for eating. I had talked with a friend earlier in the week who said she makes tomato paste with roasted tomatoes to use on pizza all winter. So I dumped all these lovely roasted tomatoes (except for a few cherries which somehow leapt into my mouth) into my food processor, along with the cloves of garlic I'd roasted with them, and pureed away.
Mmmmm, doesn't that look absolutely delicious? I had a small taste, and it is really scrumptious. The rest dutifully went in freezer bags and is waiting for winter, when it will brighten up our homemade pizza (or pasta!) with its lovely summer taste.
A confession: There was a bag full of tomatoes sitting out on a picnic table at church on Sunday. Church members often bring extra garden produce for anyone to take. Instead of taking one or two, I took the whole bag. After all, they looked a little sad, had some bad spots, and wouldn't have been great for eating fresh. I didn't want anyone to get sick. I chopped them up and roasted them on Monday, and we had them on pizza last night. Yum.
Last Saturday consisted of two such baby steps. The first was all about tomatoes. I had four tomato plants this year, each a different variety. Two did well, and the other two did just okay. The harvest is winding down, but I still had some tomatoes I needed to use. Then, Friday night a good friend brought me lots of extra tomatoes from her parents' garden! Score! So Saturday I set to work. Here's what I started out with:
 |
| Romas, golden mamas and half the cherries from my garden, the rest from Heather! |

 I cut the cherry tomatoes in half, quartered the medium-sized red and yellows, and chopped the large tomatoes in roughly equal sized pieces, cutting out the tough stem areas along the way. Then, I tossed them with a drizzle of olive oil and a sprinkle of salt and spread them out on baking sheets. When I ran out of baking sheets (or room for any more in the oven!), I used a glass 9x13. This worked well for the larger tomatoes, as they were pretty juicy - I didn't really want tomato juice all over my oven. I threw a couple cloves of garlic on each baking sheet as well.
I roasted them at 225 for 3 hours, just like Mommy did for these tomatoes when she was here a few weeks ago. They came out of the oven looking and smelling heavenly.


But these weren't just for eating. I had talked with a friend earlier in the week who said she makes tomato paste with roasted tomatoes to use on pizza all winter. So I dumped all these lovely roasted tomatoes (except for a few cherries which somehow leapt into my mouth) into my food processor, along with the cloves of garlic I'd roasted with them, and pureed away.
 | ||||
| All 3 pans of tomatoes, combined in the food processor. |
 |
| After a couple pulses... |
Mmmmm, doesn't that look absolutely delicious? I had a small taste, and it is really scrumptious. The rest dutifully went in freezer bags and is waiting for winter, when it will brighten up our homemade pizza (or pasta!) with its lovely summer taste.
 |
| Thick, smooth and delicious. Mmmmmmm... |
Saturday, September 11, 2010
Farmer's Market morning....
Kitchen afternoon!
From the farmer's market this morning: apples, peaches, Asian pears, butternut squash, kale and baby kale, fresh dill, cantaloupes, and this season's just harvested sweet potatoes.
In the kitchen this afternoon: applesauce in the crock pot, two apple cakes, and baked butternut squash. I also made whole wheat bread and three quiches. It was a rainy afternoon - a perfect time to cook.

Friday, September 3, 2010
Erin's joining me...
We were out picking tomatoes yesterday - lots and lots of them - from Erin's little garden.

She's had such an abundant harvest that it's been a little hard to keep up with all those tomatoes! She doesn't have a freezer or a pressure canner (yet). She's hoping....

 So, today while Clara naps and Erin and Luke go riding and out to eat together alone for the first time in a year, I'm doing these slow roasted tomatoes.

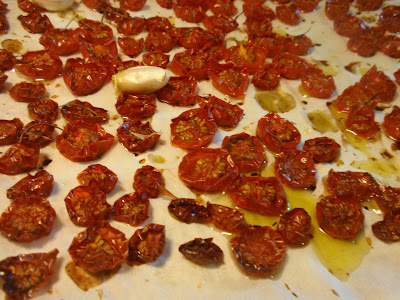
And three hours and a lovely walk up the hill with Clara later, here they are ready to eat. Notice a few empty spots on the parchment, do you? Well, it is impossible to stand near the baking sheet and not pop them in your mouth. Erin says she could live on them. They are little bit of concentrated summer tomato deliciousness.
And since we're on the subject of my daughter's tomatoes, it's a good time to tell you that Erin is going to join me on the Good Food blog. It was her idea for me to add her as an author, and I'm delighted to do it! We like to cook together, we like to talk about food and gardening and farmer's markets and eating. So, it's only natural to do it together!
Erin is a lifelong vegetarian married to a Montana meat and potatoes man. She has learned to cook things Luke likes, meaning, she's learned to cook meat - not something her mother taught her! She's also doing a great job developing healthy, happy eating habits in little Clara. So, maybe she'll add some posts on feeding babies.


She's had such an abundant harvest that it's been a little hard to keep up with all those tomatoes! She doesn't have a freezer or a pressure canner (yet). She's hoping....


Here they are, all ready to go in the oven...

And three hours and a lovely walk up the hill with Clara later, here they are ready to eat. Notice a few empty spots on the parchment, do you? Well, it is impossible to stand near the baking sheet and not pop them in your mouth. Erin says she could live on them. They are little bit of concentrated summer tomato deliciousness.
And since we're on the subject of my daughter's tomatoes, it's a good time to tell you that Erin is going to join me on the Good Food blog. It was her idea for me to add her as an author, and I'm delighted to do it! We like to cook together, we like to talk about food and gardening and farmer's markets and eating. So, it's only natural to do it together!
Erin is a lifelong vegetarian married to a Montana meat and potatoes man. She has learned to cook things Luke likes, meaning, she's learned to cook meat - not something her mother taught her! She's also doing a great job developing healthy, happy eating habits in little Clara. So, maybe she'll add some posts on feeding babies.

...or babies feeding Mamas.

Welcome, sweetheart. I'm glad you want to share this space with me.
Subscribe to:
Posts (Atom)